Applying for a verified badge can be tricky, and many people make avoidable mistakes that lead to rejection. Here's what you need to know to increase your chances of success:
- Profile Issues: Keep your profile public, complete, and consistent. Ensure your name matches your ID exactly, and avoid frequent changes during the application process.
- Document Errors: Use clear, high-resolution scans of valid IDs. For businesses, provide current proof of address (less than 90 days old).
- Content and Branding: Align your username, bio, and linked website with your public persona. Avoid off-topic or inconsistent content.
- Eligibility Timing: Wait until your account is at least 60 days old, has 10–15 posts, and is active. Apply during periods of high visibility, like after a viral post.
- Press Coverage: Free verification requires media mentions from credible, independent sources. Paid options like Meta Verified ($14.99/month) offer a workaround for smaller creators.
- Platform Rules: Follow the application steps carefully, avoid multiple submissions, and comply with community guidelines. Use two-factor authentication to secure your account.
Quick Tip: If your application is rejected, wait 30 days before reapplying, and use the time to strengthen your profile and media presence.
Avoid these common pitfalls, and you'll be better prepared to earn that blue checkmark.
Instagram Verification Is Broken: Here's How To Fix It
sbb-itb-3b12fba
Profile Setup and Identity Verification Mistakes
Your profile is the first thing reviewers look at when you apply for a verified badge. If it’s incomplete or inconsistent, your application might be rejected before they even review your documents.
Incomplete or Inconsistent Profile Details
A lot of applications fail because of simple mistakes - like missing a profile photo, having a vague bio, or keeping your account private. Platforms like Instagram won’t even consider your request unless your account is public and actively posting.
Another common issue is mismatched names. If your display name doesn’t exactly match the name on your ID or business documents, even small differences - like a nickname or an abbreviated middle name - can cause problems. For businesses, discrepancies like using "Ave." instead of "Avenue" on a utility bill compared to your Business Manager records account for 21% of rejections.
Changing your profile name, photo, or handle right before or during the application process is another red flag. Frequent edits can lead to automatic disqualification.
Having a complete, accurate profile is just the first step. Your documents also need to meet strict standards.
Weak or Incorrect Identity Documents
Blurry photos, expired IDs, or low-quality scans are responsible for 14% of verification rejections. To avoid this, submit a high-resolution PDF (at least 300 DPI) of your ID. Make sure it’s taken in good lighting, without glare, and placed flat on a contrasting background with all corners visible.
For businesses, proof of address documents like utility bills or bank statements must be less than 90 days old. Anything older will likely result in a denial. If you’re applying through Meta Verified, you’ll also need to submit your ID within three days after payment to prevent cancellation and a refund.
Beyond documents and profile details, your content and branding also play a crucial role.
Off-Brand Content and Handles
Consistency is key when it comes to your username, display name, bio, and linked website. Any mismatches can raise doubts about your authenticity. For example, if your handle doesn’t match your brand name, your bio is vague or irrelevant, or your linked website doesn’t align with your content, it can hurt your application.
For legacy (free) verification, your profile needs to reflect your public persona as it appears in press coverage or public records. As Orphiq explains:
"An incomplete profile with sporadic posts signals a casual account, not a public figure."
To improve your chances, keep your niche clear, ensure your branding is consistent, and use your bio to effectively communicate who you are. Reviewers should be able to understand your public presence at a glance. When your profile and documents align with your public image, you’re far more likely to succeed in getting verified.
Eligibility and Timing Mistakes
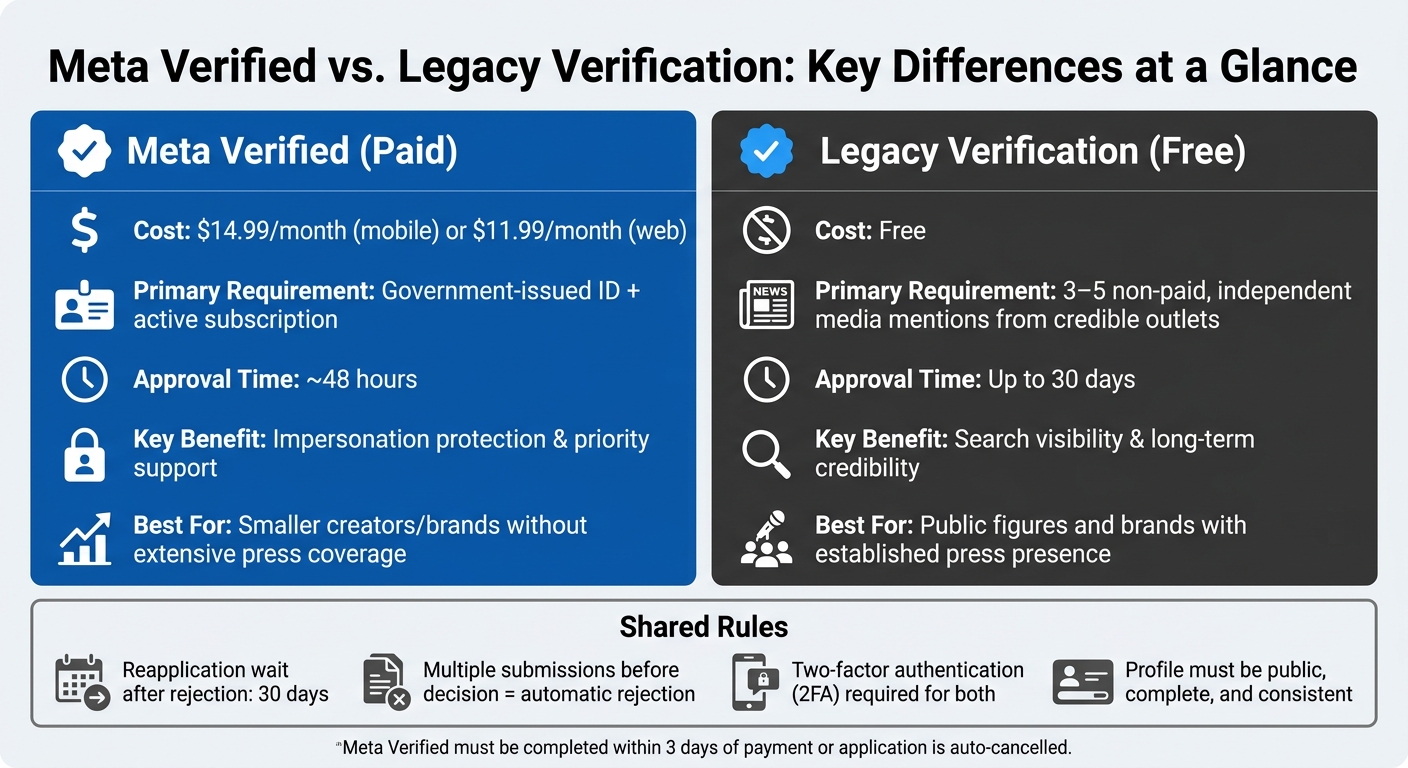
Meta Verified vs. Legacy Verification: Key Differences at a Glance
Even a well-prepared profile can face rejection if you apply at the wrong time or fail to meet platform-specific requirements. Fortunately, these errors are avoidable once you know what to watch out for.
Applying Before Your Account Is Ready
Applying too soon can lead to an automatic rejection. To improve your chances, wait until your account is at least 60 days old and has 10–15 recent posts. Timing is also about more than just account age. As Kirsti Lang explains:
"Timing can be everything, so make sure you are careful and thoughtful about your application. Is a Reel of yours going viral right now? That's a great time to apply."
A surge in visibility - whether from a viral post or recent media attention - can significantly boost your application. Choosing the right moment shows the platform that your account is active and relevant.
Ignoring Notability and Press Coverage
For free (legacy) verification, notability is the most critical factor. Research shows that 45% of verification rejections stem from a lack of sufficient media coverage or public interest. Instagram defines "notable" as being widely recognized and frequently searched for, requiring organic, non-paid media mentions.
Ben Fingeret, VP of Social at Full Picture, puts it plainly:
"Someone can have all the clout in the real world, but if there's no press to back that up, that's a really big signal to Instagram that maybe this isn't worth it."
To strengthen your case, aim for three to five credible, non-paid media features - not just mentions in roundups - before applying. If your media presence isn't strong enough yet, Meta Verified (starting at $14.99/month) can provide a temporary solution while you build your profile. Knowing the nuances of each platform is key to setting yourself up for success.
Misunderstanding Platform-Specific Processes
Once you’ve addressed eligibility and timing, it’s crucial to understand the specific steps for each platform. Instagram, for instance, offers two distinct verification options. The table below highlights their differences:
| Feature | Meta Verified (Paid) | Legacy Verification (Free) |
|---|---|---|
| Cost | $14.99+/month | Free |
| Primary Requirement | Government ID & active subscription | Multiple non-paid media mentions |
| Approval Time | ~48 hours | Up to 30 days |
| Key Benefit | Impersonation protection & priority support | Search visibility & credibility |
Submitting multiple applications before receiving a decision will cancel your request. If your application is rejected, you’ll need to wait 30 days before trying again. Make sure every submission is thoughtful and complete to avoid unnecessary delays.
Content Quality, Security, and Behavior Mistakes
Platforms evaluate your content, engagement, and security when considering verification applications. Below, we break down common mistakes related to these areas that could hurt your chances. While setting up your profile and applying at the right time are important, maintaining high-quality content and strong account security is just as critical.
Violating Community Guidelines
If your account has a history of violating community guidelines, your application is likely to be rejected. Instagram makes this clear:
"Overstepping these boundaries may result in deleted content, disabled accounts, or other restrictions." - Instagram Team
Before applying, take the time to review your posts for anything that could be flagged, such as hate speech, copyright violations, or misinformation. Ben Fingeret, VP of Social at Full Picture, emphasizes the importance of this:
"If you get too many flags, they will deactivate your account or kick you off the platform for a little bit."
A spotless content record isn’t just recommended - it’s absolutely necessary.
Inconsistent Posting and Low Engagement
Accounts that post sporadically or have low engagement often appear inactive. Data reveals that creators with the highest follower growth post at least 10 Reels per month. On the flip side, avoid using engagement bait tactics, as they can hurt your content’s reach and make your account seem inauthentic.
Using Fake Followers or Engagement
Buying followers or likes is a major red flag. It creates an obvious gap between your follower count and actual engagement, violating platform authenticity rules. Jason from Blabla.ai offers a clear warning:
"Do not attempt to buy a badge or use third-party services that claim they can guarantee verification - these violate Instagram's terms and can harm your account."
Weak Account Security
Even if your content and engagement are solid, weak security can jeopardize your verification chances. Two-factor authentication (2FA) is not only required for Meta Verified but also demonstrates account legitimacy for legacy verification. Use a password manager to keep your credentials secure and regularly review active sessions to detect unauthorized access.
If you use third-party tools to grow your account, security becomes even more critical. Trusted platforms like Outfame (https://outfame.com) provide secure growth services without ever asking for your account password. Also, be cautious of scams - platforms will never send direct messages offering verification. Any such message is a scam.
Mistakes During the Application Process
Even the most prepared creators can slip up during the final stages of submitting their application. Every step counts when you're building the trust and legitimacy your badge represents. For more insights on building authority, check out our Instagram growth blog.
Providing Inaccurate or Vague Information
Accuracy is everything. Your profile name must match your government-issued ID exactly - no nicknames or variations. The ID photo you submit needs to be clear, well-lit, and show all four corners. If the photo is blurry, angled, poorly lit, or incomplete, your application will be denied. For businesses, your profile name must align with the name on your official business documents. Even small mismatches can lead to automatic rejection.
Additionally, avoid submitting paid or sponsored articles as proof of credibility. Platforms only accept independent, editorial coverage from reputable outlets.
Once you've ensured your information is correct, resist the urge to rush into a new application if your initial submission is denied.
Reapplying Too Quickly After Rejection
One common mistake is reapplying too soon after being rejected - or even before receiving a decision. Michael Keenan from Shopify explains:
"Applying for a verified badge multiple times before you've heard back from Meta will automatically get your application rejected."
Instagram enforces a 30-day waiting period after a denial before you can reapply. Use this time wisely. Work on securing 2–3 new features in respected, independent publications, address any identity mismatches, or resolve lingering policy issues. If your rejection was tied to a guideline violation, consider waiting at least 60 days to demonstrate sustained compliance before submitting again.
And above all, make sure you're following the correct process when you reapply.
Using the Wrong Submission Path
Always use the official settings in your app to apply. For legacy verification, use the "Request Verification" tab, and for the paid subscription option, go through the "Meta Verified" tab. Be cautious of any direct messages offering verification - these are scams.
"Verification is always something that you have to initiate. Instagram will never, ever come out and just offer it to you." - Ben Fingeret, Vice President of Social, Full Picture
Also, double-check your account type. Meta Verified is currently available only for individual profiles, not Facebook Pages. Notable Pages can still pursue legacy verification, but the Meta Verified process must be completed within 3 days, or your application will be automatically closed and refunded.
Conclusion: How to Improve Your Chances of Getting Verified
Key Takeaways for a Successful Application
Getting verified requires careful attention to detail and preparation. Start with the basics: a complete and public profile, a clear bio, and consistent posting. Double-check that your profile details and documents match your public identity. Beyond that, genuine press coverage, two-factor authentication, and engaging authentically with your audience are crucial factors that can make your application stand out.
For smaller creators or brands lacking extensive press coverage, Meta Verified provides a practical alternative. Ben Fingeret, Vice President of Social at Full Picture, explains:
"If you're a smaller creator or a smaller brand trying for a legacy, it might be good to do Meta Verified as a stopgap if you still want the impersonation protection and baseline credibility but you don't have that much press right now."
Meta Verified is priced at $11.99/month on web or $14.99/month on mobile. It offers immediate protection and credibility while giving you time to build your public presence.
To strengthen your application, take the time to audit your online presence and work on securing credible press coverage.
Next Steps for Creators and Brands
Start with a self-audit. Search for your name or brand on Google, set up Google Alerts to monitor new mentions, and make sure your profile name matches your government-issued ID exactly. Once you’ve covered these basics, focus on increasing your visibility. Aim for at least three features in reputable, non-paid media outlets, and consider creating a simple media kit. Include high-quality photos, a bio, and links to any existing coverage to make outreach to journalists easier.
Building a genuine, engaged audience is just as important as updating your documentation. Platforms look for real interaction patterns, and growing your following takes time and dedication. Tools like Outfame can help streamline this process with AI-driven targeting and analytics, allowing you to cultivate the kind of audience that strengthens your verification application.
Timing is everything. Submit your application when your visibility is at its peak - whether it’s after a viral post, during active press coverage, or following a major collaboration. By avoiding common pitfalls and following these steps, you’ll be well-positioned to submit a strong and convincing application for verification.
FAQs
What counts as “notable” press for free verification?
Press coverage that stands out includes features in major news outlets, articles from well-regarded sources, appearances on TV or radio, podcast interviews, or other forms of prominent media attention. These examples highlight public interest and establish credibility, both of which are crucial for securing free verification approval.
Why did my verification request get rejected?
Your verification request might have been denied for several reasons, such as limited media coverage, low public interest, inactivity on your account, the account being too new, regional limitations, or violations of Instagram's policies (like fake engagement or impersonation). To get verified, Instagram looks for accounts that show genuine identity, public recognition, and adherence to its community and content guidelines.
Should I choose Meta Verified or legacy verification?
When deciding between the two, it’s all about what fits your needs. Meta Verified is a paid subscription that gives you a verified badge, extra account protection, and wider reach - perfect for smaller creators or brands looking to grow. On the other hand, legacy verification is free but reserved for public figures or entities with established media recognition. If you don’t have press coverage, Meta Verified could be the better option, while legacy verification works best for those who meet its stricter requirements.


